Crafting Your Own Breakbeats in Ableton

Elevating Your Rhythm Game
In the vibrant world of electronic music production, mastering the art of creating custom breakbeats is a skill that distinguishes standout producers. This guide is your pathway into the exciting process of morphing a classic break into a unique, dynamic beat using Ableton Live. We're diving deep into each stage - from the careful selection of the perfect break to intricate tempo manipulation - empowering you to infuse your tracks with a unique rhythmic personality.
Choosing the Ideal Break

The journey to crafting a unique breakbeat in Ableton begins with selecting the right foundation. This breakbeat should resonate with your musical style and vision. Whether it's a well-known funk break or a hidden treasure, your choice sets the tone for your creation. Consider the quality and tempo of the break, as these will significantly influence your final product.
Sources for Classic Drum Breaks:
Tracklib: A rich resource for original breaks, offering a vast library of tracks that you can legally sample. From vintage funk to soul, you're likely to find the perfect break for your track.
WhoSampled: While primarily a database for identifying samples in songs, WhoSampled can be a great way to discover classic breaks used in popular music.
Splice: Known for its extensive library of loops and samples, Splice offers a range of drum breaks, from classic to modern styles.
Loopmasters: Another excellent resource for high-quality drum loops and breaks, suitable for a variety of music genres.
Converse Sample Library: An eclectic collection of drum breaks and loops, available for free, offering a diverse range of drum sounds.
The Drum Broker: Specializing in drum loops and breaks, this site is a treasure trove for producers looking for authentic and vintage-sounding breaks.
Digging for Obscure Breaks:
Online Vinyl Shops: Sites like Discogs or eBay can be goldmines for discovering rare and obscure records that may contain the unique break you’re looking for.
YouTube Channels: Many YouTube channels are dedicated to rare grooves and breaks. Digging through these can uncover some hidden gems.
Music Blogs and Forums: Communities dedicated to music production, sampling, and digging (like Reddit’s r/Drumkits) can be invaluable resources for finding unique breaks.
Quality and Tempo Considerations:
Quality Check: Ensure the break you choose is of good quality — clear, without too much noise or distortion, unless that's part of the desired vibe.
Tempo Matching: Consider the tempo of the break in relation to your track. While tempo can be adjusted, starting with a break that’s close to your target tempo can make the process smoother.
By carefully selecting your break from these diverse sources, you set a solid foundation for your track. This initial choice is a critical step in defining the character and energy of your final production in Ableton Live.
Transforming Break to MIDI

Ableton’s 'Convert Drums to New MIDI Track' feature is a game-changer here. It analyses the drum components in the audio file and transforms them into a MIDI sequence, opening up a world of detailed manipulation far beyond what's possible with the original audio.
Drum Rack Selection & Personalization: Crafting Your Unique Sound
In Ableton Live, the Drum Rack is a powerful and versatile tool for building and customizing your drum sounds. Selecting the right acoustic kit is pivotal in capturing the essence of your breakbeat while infusing it with your unique style.

Ableton Drum Rack Kits to Explore:
Session Drums Studio: Ideal for a high-quality, natural drum sound. It offers a wide range of snares, kicks, and cymbals, suitable for various genres.
Drum Machines: Perfect for those looking to blend classic drum machine tones with their breakbeats. It provides a mix of vintage and modern drum machine sounds.
Studio Drummer: A comprehensive kit for realistic drum sounds, offering extensive customization for each drum element.
Session Drums Club: Tailored for electronic music production, this kit provides punchy and clear drum sounds that can stand out in a mix.
Vintage Drum Elements: A go-to for producers looking to incorporate a retro feel into their breaks, offering sounds reminiscent of classic drum kits.
Personalization Techniques:
Swapping Drum Elements: Experiment by swapping out different snares, kicks, and cymbals within the kit. This could mean replacing a tight snare with a more resonant one, or a punchy kick with something deeper.
Fine-Tuning Sounds: Take advantage of Ableton’s built-in effects and macros to fine-tune each drum sound. Adjust the decay on a snare, the pitch of a kick, or the sustain of a cymbal to shape the overall tone of your kit.
Layering Sounds: For added depth, try layering different drum sounds. This can create a more complex and unique drum sound that wouldn’t be achievable with a single sample.
External Acoustic Drum Plugins:
Addictive Drums 2 by XLN Audio: Known for its realistic drum sounds and extensive customization options.
Superior Drummer 3 by Toontrack: Offers a wide range of drum sounds recorded in high-quality studios, with deep editing capabilities.
BFD3 by FXpansion: Renowned for its natural and expressive drum sounds, suitable for a variety of music styles.
Each of these plugins offers a different flavor and set of features, allowing you to extend your sonic palette beyond Ableton's native offerings. They are particularly useful for producers seeking more organic and realistic drum sounds.
By carefully selecting and personalizing your drum rack in Ableton, and potentially incorporating external plugins, you craft not just a rhythm section, but an integral part of your track’s identity.
The Nuance of Drum Processing: A Detailed Exploration
The art of drum processing in Ableton Live is where your breakbeat truly begins to take on its unique character. This stage is crucial for defining the tone and feel of your drums. Here's how to approach it with precision and creativity:
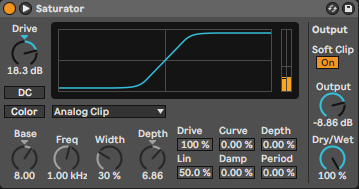
Saturation for Warmth and Texture: Saturation is your first tool for adding depth and warmth to your drums. This technique enriches the harmonic content, bringing out subtleties in the drum sounds that were previously inaudible. Experiment with various types of saturation — from subtle tube warmth to gritty tape distortion — to discover the character that best complements your break. Each type imparts a different coloration and texture, so take your time to find the perfect match for your sound.
Compression for Punch and Clarity: Next, compression plays a pivotal role. It’s not just about leveling dynamics; it’s about enhancing the punch and presence of your drums. Adjust the attack and release settings to either emphasize the transients or smooth them out, depending on the energy you want to bring to the break. A fast attack can tame sharp transients, while a slower attack allows them to punch through. Use compression judiciously to maintain the natural dynamics of the break, ensuring that it doesn't lose its original vibe.
EQ for Balance and Focus: EQ is your scalpel for surgical precision. Use it to shape the frequency spectrum of each drum sound. Cut unnecessary frequencies that muddy the mix and boost those that enhance the drum’s character. For instance, a slight boost in the low-mid frequencies can enrich the body of a snare, while a high shelf boost can bring out the shimmer in cymbals. Remember, EQ adjustments should be made in context with the full mix, as each change affects how the drums sit in the overall sonic landscape.
Spatial Depth with Reverb: Reverb is the final touch for adding spatial depth to your drums. It can create a sense of space and environment around your break. Choose a reverb type that complements the drum’s character - a small room reverb can add a sense of intimacy, while a larger hall reverb can create a sense of expansiveness. The key is subtlety; too much reverb can wash out your drums, so use it sparingly to enhance, not overpower.
Advanced Tips:
Parallel Processing: For an advanced twist, try parallel compression. Mix a heavily compressed version of your drums with the unprocessed signal. This technique retains the natural dynamics of the drums while adding density and power.
Layering for Complexity: Consider layering your drums with other samples to add complexity. This can fill out the sound, adding richness and depth.
Sidechain for Groove: Utilize sidechain compression to groove your drums with other elements of your track, such as the bassline, creating a cohesive rhythmic interplay.
By meticulously processing your drums, you're not just shaping sounds; you're crafting an emotional response. This nuanced approach to drum processing in Ableton Live is essential for creating a breakbeat that not only sounds great but feels right.
Recording & Refinement: Capturing the Essence
Once your breakbeat has been intricately processed, it’s time to transform it from a MIDI marvel into a polished audio masterpiece. This conversion is more than just a technical step; it's about capturing the essence of all your creative processing and effects in a format that’s versatile and mix-ready.

Recording with Precision: Render your processed MIDI drums into a new audio track. This process not only captures your drum sequence but also all the subtle nuances of your processing - the warmth of your saturation, the punch of your compression, and the depth of your EQ adjustments.
Refinement for Perfection: Now, delve into the fine art of refinement. This stage is about perfecting your breakbeat, ensuring it resonates with the overall feel of your track. Adjust the timing for tighter synchronicity or a more laid-back groove. Tweak the pitch to match the tonal quality of your track or experiment with the texture to give it the right sonic character. This meticulous refinement ensures that your breakbeat doesn’t just sound good on its own but also complements the other elements of your track seamlessly.
Mastering Warp Mode & Tempo Dynamics: Exploring Rhythmic Realms
Ableton Live’s warp mode is a potent tool for experimenting with tempo while keeping the soul of your break intact. The 'Re-Pitch' mode is particularly crucial here, as it allows you to speed up or slow down the tempo without altering the original pitch — a key feature for preserving the authentic vibe of your break.

Tempo Manipulation for Energy Shifts: Engage the 'Re-Pitch' mode and start playing with tempo variations. Watch as your break transforms - what was once a laid-back groove can turn into an adrenaline-pumping jungle or a fast-paced drum and bass rhythm. This tempo manipulation isn't just about speed; it's about exploring how different tempos can change the entire feel and groove of your break.
Observing the Rhythmic Impact: As you adjust the tempo, pay close attention to how it impacts the groove and feel of the break. Notice the interplay between the sped-up rhythms and the other elements of your track. This observation is key to understanding how tempo shifts can be used creatively to enhance the energy and dynamics of your overall production.
By mastering these steps of recording, refinement, and warp mode manipulation, you are not just creating a breakbeat; you are sculpting a rhythmic experience that can define the energy and emotion of your entire track.
Your Breakbeat, Your Signature
By following these steps, you’ve not only crafted a unique breakbeat but also elevated your prowess in drum programming and sound design within Ableton Live. This journey through breakbeat creation is more than a technical process; it’s an artistic expedition. Embrace experimentation, push your creative boundaries, and most importantly, infuse your musical narrative into every beat you create. Remember, in the realm of breakbeats, your imagination is the only limit.