Using Ableton's Analog to Create Ethereal Techno Pads
Pads are a staple element of techno music, adding depth and atmosphere to the overall sound. Creating the perfect pad sound can be a challenge, but with Ableton's Analog, it's easier than ever to create lush, evolving textures that will elevate your tracks to the next level.
Techno ethereal chords are characterized by their rich, expansive sound, and to achieve this, programming complex, layered chords is essential. One way to create this sound is by using a range of octaves in your chords. By using multiple octaves, you can create a thicker, more textured sound that fills out the frequency spectrum.
To make the chords even more expressive, you can use MPE (MIDI Polyphonic Expression) and basic velocity to control the parameters of each note. MPE allows you to control the pitch, timbre, and other parameters of each note in a chord independently, creating a dynamic and expressive sound. Basic velocity can also be used to control the volume and intensity of each note in a chord, allowing you to create subtle variations in the sound.
Chords
When programming techno ethereal chords, it's important to use a combination of different chord voicings and inversions to create movement and interest in the sound. You can experiment with different chord shapes and progressions to create a unique sound that fits the mood of your track.
Oscillators
Analog's dual oscillators allow you to create rich, complex sounds that evolve over time. To create a pad sound, start by selecting two oscillator waveforms that complement each other. For example, try combining too sawtooth waveforms for a warm, full-bodied sound. Then, experiment with detuning the oscillators slightly to create a subtle, chorusing effect.
Filters
Next, use Analog's filter to shape the timbre of your sound. The low-pass filter is particularly useful for creating pad sounds, as it allows you to remove harsh high frequencies and emphasize the warm, mellow tones of your oscillators. Experiment with different filter cutoff frequencies and resonance settings to find the perfect balance for your track.
Effects
Once you've created your basic pad sound, it's time to add depth and space using effects like reverb and delay. Reverb can be used to create a sense of space and distance, while delay can add a subtle rhythmic element to your pads. Try experimenting with different reverb and delay settings to find the perfect sound for your track.
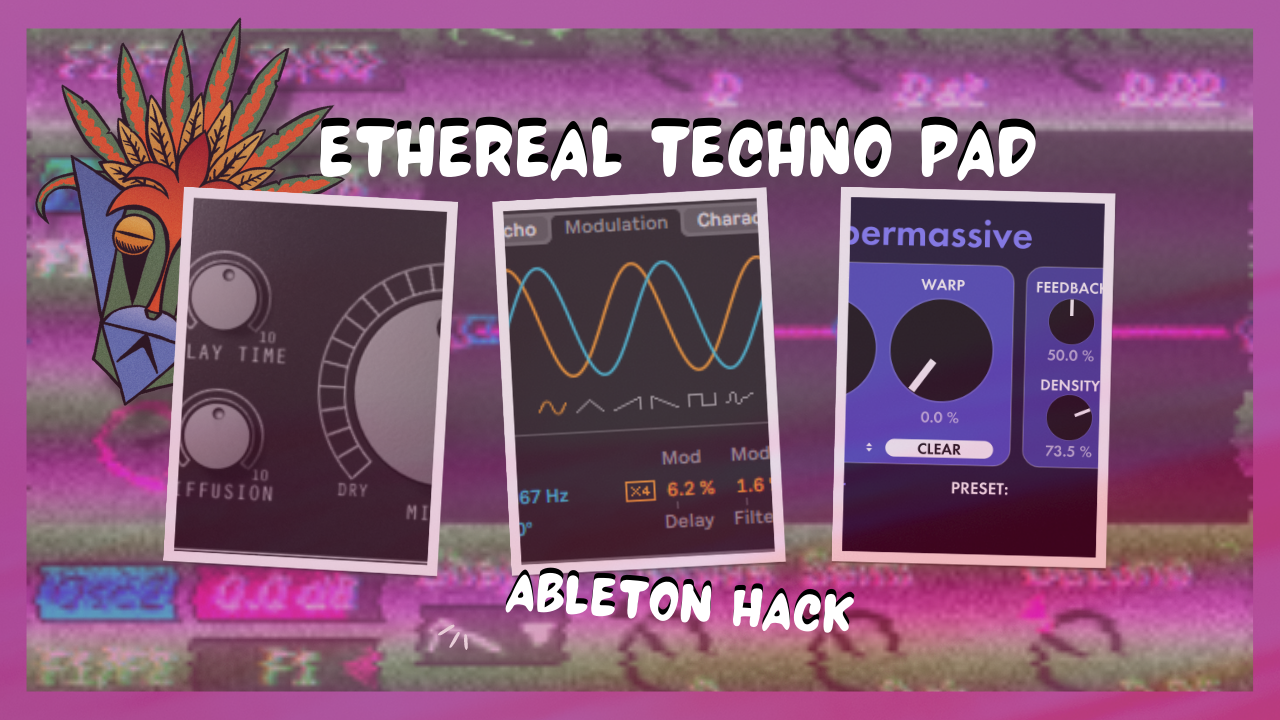
Delay and reverb are two essential effects in music production that can be used to create depth and space in a mix. Delay is an effect that repeats a sound after a certain amount of time, while reverb simulates the sound of a space by adding multiple delayed reflections of the sound.
To add a series of delays and reverbs to a sound, you can use a combination of different plugins and presets. One way to achieve this is by using two echoes, one with the Ethereal Canyon preset and one with Ableton Delay and Filter Delay. The Ethereal Canyon preset adds a shimmering, ethereal quality to the delay, while the Ableton Delay and Filter Delay allows you to control the amount of filtering and delay time.
Another way to add depth and dimension to a sound is by using a hybrid reverb set to Plate and Shimmer. A plate reverb emulates the sound of a metal plate vibrating in a room, while a shimmer reverb adds high-pitched harmonics to the reverb tail. By combining these two types of reverbs, you can create a unique, textured reverb sound that complements the original sound.
To further enhance the sound, you can add Valhalla's Supermassive plugin, which is a granular delay effect. Granular delay breaks the sound down into small grains and repeats them at varying speeds and pitches, creating a glitchy, atmospheric effect. Set the delay time to 1/16th and turn up the density for added effect. We will also use
LFO
In addition to effects, Analog's built-in LFO and envelope modules can be used to add movement and variation to your pads. Try using the LFO to modulate the filter cutoff frequency or the oscillator pitch, or use the envelope to create a slowly-evolving texture that changes over time.
MPE & More LFO’S
To add more depth and expression to the techno ethereal chord, you can use Abletons LFO modulator and MPE expression Control. LFOs can be used to modulate the filter cutoff or resonance, adding subtle variations to the sound. MPE expression can be used to control pitch bend, vibrato, and timbre, creating a more dynamic and emotional sound. To control MPE expression, Ableton's Expression Control MIDI effect can be used. One tool that was also employed is K-Devices' Target, which provides an efficient way to modulate multiple parameters simultaneously. We can do this manually or map a LFO to the targets source parameter.
Experimentation is key when using these techniques, as too much modulation or expression can result in an overwhelming sound, while too little can make the sound static and dull. By finding the right balance of modulation and expression, you can create a more complex and immersive techno-ethereal chord.
Overall, Analog is a powerful tool for creating ethereal techno pads that will add depth and atmosphere to your tracks. By experimenting with oscillator waveforms, filters, effects, and modulation, you can create a unique sound that will set your music apart from the rest.