
Drum Synthesis: Massive Hats

Native Instruments Massive is truly a great synth and even with the eagerly anticipated release of Massive X, you should not forgot all the truly huge sounds you can make with the predecessor.
Building drums in Massive is immense, it is properly one of the best synths for it due to its vast noise modes. And in this blog post we are going to look at the noise generator to build some 808 style hats.
Noise:
Start by loading in Massive and initialising the patch, which you can find in the global section. This will help keep things nice and clean.

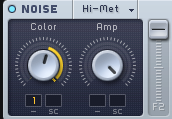
With the patch blank, lets switch off the 3 oscillators as we will not be needing them, lets also insure that the noise generator is switched on. Switch the noise mode to hi-metallic (this is the best for 606 and 808 hats). Put the color to 50% and amp to 100%. We will be using the color to pitch the hihats.

Already we have a decent sounding hat, what we will want from track to track is to control the pitch (color) of the hat, so let's map macro 1 to the color on the noise generator. Remember to add a macro, grab the marco four point arrow in the macro section and then drop it into the parameter you wish to add to the macro, in this case it's the color. From there turn the number via the parameter box to add a macro range. If you don't do this the macro will do nothing. Lastly, let pitch the hat up, to do this turn the macro to 75%.

FX:
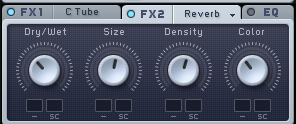
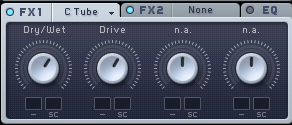
Now, lets beef up the sound with some effects, on effect 1 use the classic tube with the dry/wet and drive set to 60%. This will help add some extra harmonics and texture to the hat. From there add the reverb, and shaper (via insert 1). The reverb can help add some space and dimensions. And with the shaper this is great for a rawer, grittier sound.

Amp:
With the hat sounding much more juicy, lets set up the amp envelope. On Massive this is defaulted to envelope 4. Once in the envelope 4 tab, set the decay level to 0%, decay time to 25% and release to 30%. It will also be a good idea to map the decay and release times to a macro to have full control over it.

Clean Up:
As you can hear there seems to be some harsh frequencies in the low mid range, to solve this issue, lets send the noise generator to filter 1. To do this set the mixer to F1.
Go to the filter 1, set the mode to hp 4 (high pass). And from there set the cutoff to 65%. This will cut out the frequencies bellow the cutoff point.

Conclusion:
As you can see by using a synths noise generator you can make as many synthetic hats you want. Its a good idea to explore all the synth in your arsenal and see how the noise generators sound, each will give you a different vibe. By building your own presets you are slowly developing your own sound which is integral to help you get your head above the overcrowded industry.


- 808 hihats
- ableton
- Acid
- Acid Techno
- Arturia
- Arturia Acid V
- audio effect
- bass
- beat
- blog
- chord
- dark techno
- drum
- drum mixing
- drum synth
- drums
- dub techno
- effect
- EQ
- free loops
- free music
- free sample pack
- freebie
- fx
- grain delay
- hats
- house
- how to
- kick
- kick drum
- learn
- loop
- maschine
- massive x
- microhouse
- minimal
- mixing
- mixing tips
- moog
- native instruments
- operator
- percussion
- preset
- raw techno
- sample pack
- snare
- sound a like
- sound design
- star wars
- synth
- synthesis
- tech
- tech house
- techno
- techno kick
- techno mixing tips
- techno production
- trap
- tutorial