This deep house bassline starts half a beat after the kick. A low G jumps up an octave on beat two, then a pair of short notes answers it near the end of the bar. The gap between those phrases gives the bass room to ring out.
We’ll build the patch from a saw and a square wave, use Drift’s filter envelope to give each note its pluck, then program the four-bar groove at 124 BPM.
1. Build the bass from two oscillators
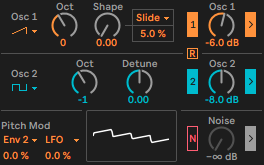
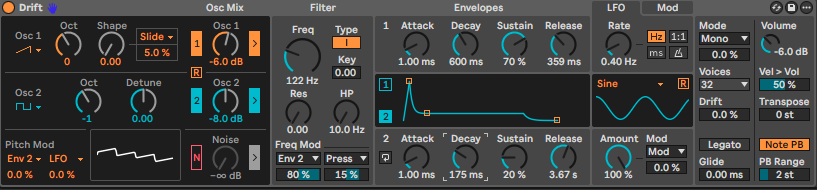
Load Drift onto a MIDI track. Choose Mono, turn Legato off and set Glide to 0.00 ms. Leave global transpose at 0 st, set the instrument volume to −6.0 dB and keep Drift at 0% while you build the patch.
| Control | Oscillator 1 | Oscillator 2 |
|---|---|---|
| Waveform | Saw | Square |
| Octave | 0 | −1 |
| Mixer level | −6.0 dB | −8.0 dB |
| Filter routing | On | On |
Set Oscillator 1’s Shape and Oscillator 2’s Detune to 0.00. Leave Noise off. Play G1, then switch Oscillator 2 off and back on. The square wave adds a lower octave beneath the saw. You’ll hear its contribution especially clearly when the MIDI phrase jumps to G2.
2. Shape the pluck with the filter
Select the Type I low-pass filter. Set Freq to 122 Hz, Res and Key to 0.00, and the high-pass filter to 10.0 Hz. In the filter’s Freq Mod section, choose Env 2 in the first slot and set the amount to 80%.
Use these settings for the two envelopes, with Envelope 2 in ADSR mode.
| Control | Envelope 1 · volume | Envelope 2 · filter |
|---|---|---|
| Attack | 1.00 ms | 1.00 ms |
| Decay | 600 ms | 175 ms |
| Sustain | 70% | 20% |
| Release | 359 ms | 3.67 s |
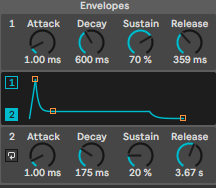
Hold G1 for a beat. The fast filter attack lets the upper harmonics through straight away. Over the next 175 ms, the cutoff falls towards the filter envelope’s sustain level. The volume envelope decays more slowly and sustains at 70%, so you can hear the darker part of the note after the initial pluck.
Now play a sixteenth note. At 124 BPM that’s about 121 ms, so the note ends while the filter envelope is still decaying. Its 3.67 s release lets the cutoff ease back slowly, but the 359 ms volume release fades the audible tail much sooner. To tighten the space between notes, start by shortening Envelope 1’s release.
3. Add variation with velocity and Drift
Place Live’s Velocity MIDI effect before Drift. Select Both under Operation, choose Clip mode and set Random to 22. Leave Drive and Comp at 0.00, with Out Low at 1 and Out Hi at 127.
Back in Drift, select Vel in the second Freq Mod slot and set it to 15%. Set Vel > Vol to 50%. The clip can now use fairly even velocities and still get a little variation on playback. Higher velocities open the filter further and give the note more level.
Turn Drift up to 22% for the finished patch. Loop the G1–G2 phrase while you adjust it so you can judge how much pitch variation suits the bass.
4. Program the four-bar bassline
Create a four-bar MIDI clip in 4/4, select a 1/16 grid and draw each note one sixteenth long. Start with velocities around 100. The positions below use Live’s bar.beat.sixteenth display, and the note names match the piano roll.
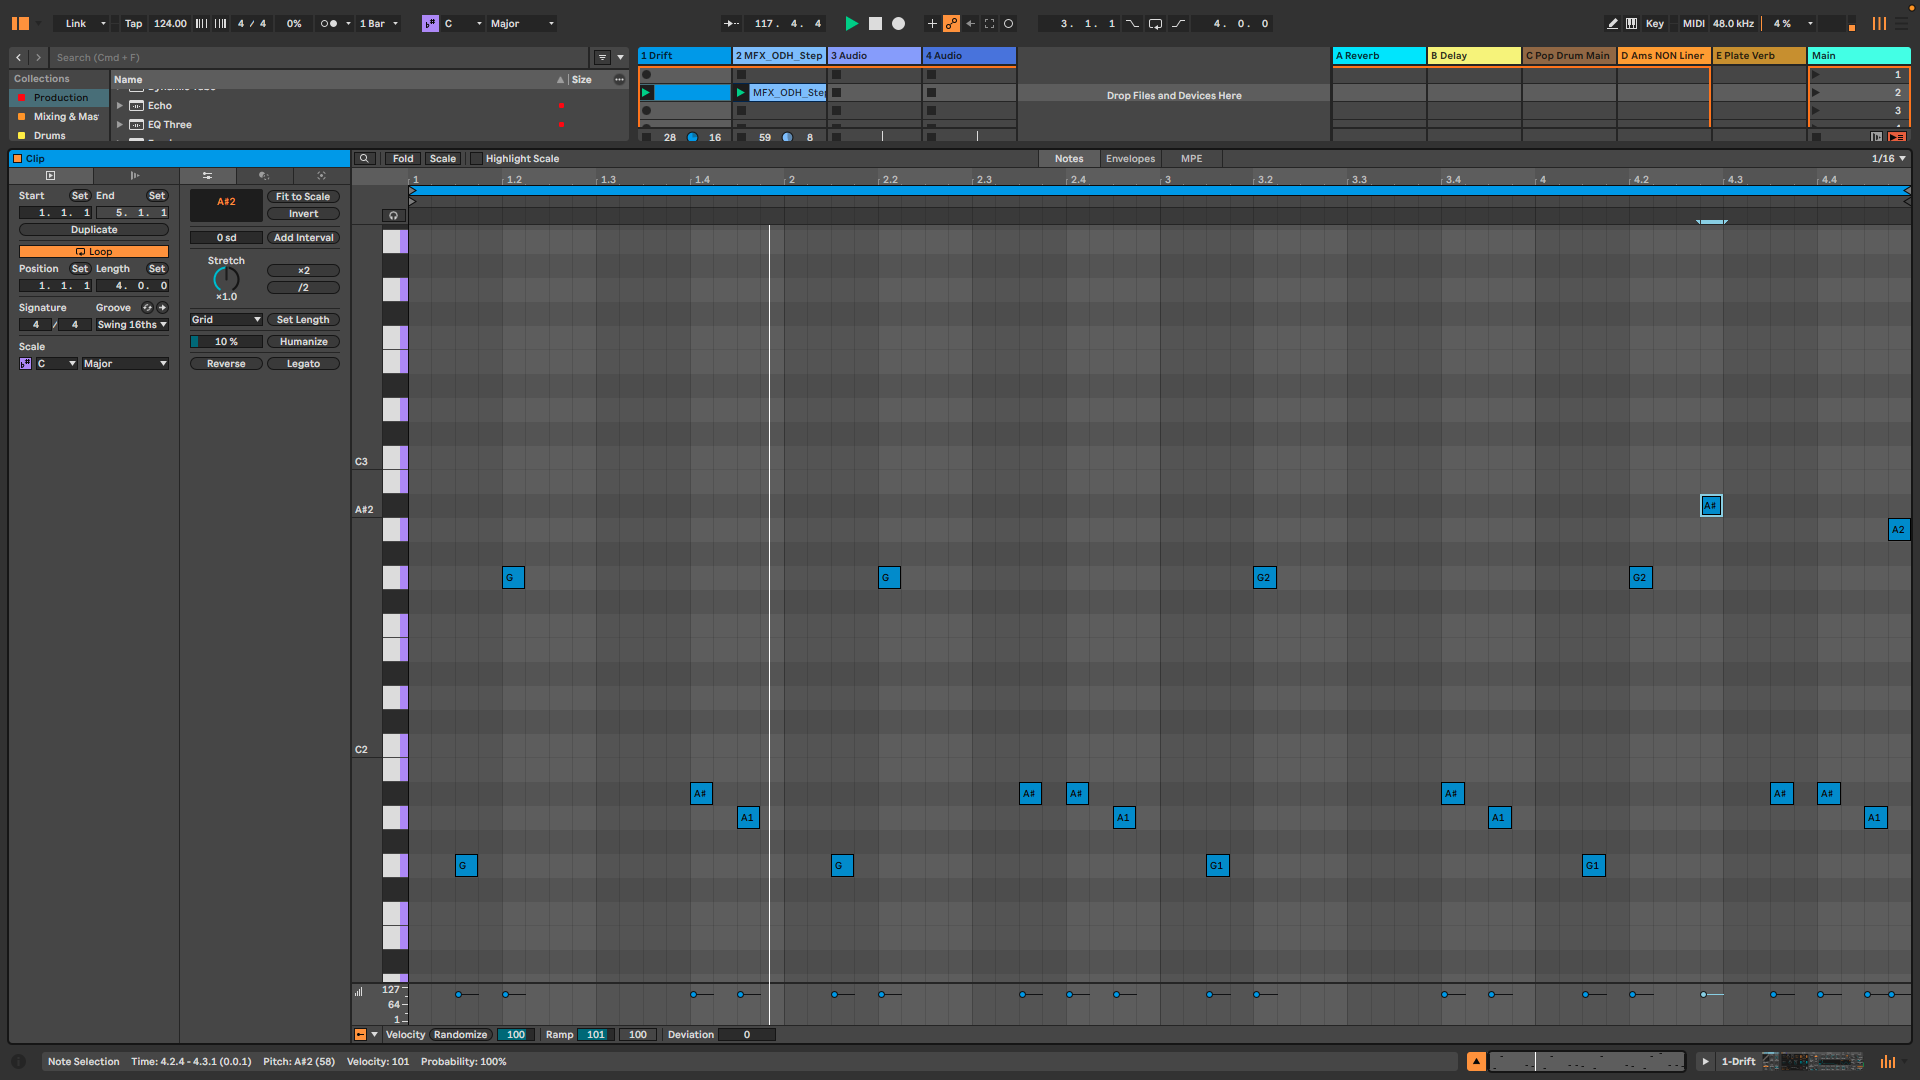
Listen to bar one against a four-to-the-floor kick. The first G sits between kicks, while the octave lands directly on beat two. Leave beat three empty in bars one and three. That gap makes the extra A♯ in bars two and four stand out. On the final sixteenth, A2 gives the loop a lift before it comes back to the low G.
The clip has Swing 16ths selected. Adjust the groove amount with the drums playing, listening particularly to the high A♯ at 4.2.4 and the final A2.
5. Finish the bass with Live’s audio effects
Add these devices after Drift, in the order shown. Loop all four bars while you set the levels so you hear what the processing does to both the low G and the higher pickups.
| Device | Settings |
|---|---|
| Saturator | Analog Clip · Drive 9.7 dB · Output −7.1 dB · No Clip · Color on · Dry/Wet 100% |
| Channel EQ | Low +4.8 dB · Mid and High 0.0 dB · Output 0.0 dB |
| Chorus-Ensemble | Chorus mode · high-pass 249 Hz · Width 100% · Time 20 ms · Rate 0.90 Hz · Amount 50% · Feedback 0% · Dry/Wet 50% |
| Pedal | OD · Drive 4.0% · Sub on · Bass, Mid and Treble 0.0% · Output 0.00 dB · Dry/Wet 6.2% |
| Saturator | Analog Clip · Drive 4.6 dB · Output −3.7 dB · Soft Clip · Color on · Dry/Wet 100% |
The first Saturator adds harmonics before Channel EQ lifts the low end. On Chorus-Ensemble, listen to the upper G as you bring the mix up to 50%. The 249 Hz high-pass keeps the lowest part of the bass out of the chorus processing. Pedal is blended in at just 6.2%, followed by a second, lighter stage of saturation.
Compare the whole chain on and off at the same listening level, with the kick playing. If the two compete after processing, bring down Channel EQ’s low boost and listen again

Turn the patch into your own sound
Save the instrument and try two variations over the same MIDI clip. For a rounder attack, ease back the 80% Env 2 modulation amount. For a shorter tail, leave the filter alone and reduce Envelope 1 Release. Listen to the gap after the first G2 to hear the difference.
For more bass sounds to adapt, explore Novatron, Mind Flux’s Ableton Drift preset pack for deep house and tech house.


FAQs
-
Start with a saw wave on Oscillator 1 and add a quieter square wave one octave below it. Set the Type I low-pass filter to 122 Hz, choose Env 2 as the filter modulation source and set the amount to 80%. A 1 ms attack and 175 ms decay on Envelope 2 give each note a bright start that quickly darkens into the body of the bass.
-
The filter decay controls how quickly the brightness falls away while you hold a note. The volume release controls how long you hear the bass after the MIDI note ends. If the attack feels too bright for too long, shorten Envelope 2’s decay from 175 ms. If the tail runs into the next kick, shorten Envelope 1’s release from 359 ms.
-
At 124 BPM, draw a short G1 halfway between the first and second kicks, then place G2 directly on beat two. Leave beat three empty in bars one and three. When you add an A♯1 late in beat three of bars two and four, you get a variation you can hear even before applying Swing 16ths.
-
Place Live’s Velocity MIDI effect before Drift and set Random to 22. In Drift, route Vel to Freq Mod at 15% and set Vel > Vol to 50%. Each change in velocity then affects both brightness and level, so a repeated G1 can have a slightly different attack each time.
-
In Chorus-Ensemble, set the high-pass filter to 249 Hz and Dry/Wet to 50%. Loop the jump from G1 to G2 with the kick playing. You should hear more movement on the upper note while the low G stays centred.
Mind Flux presents Novatron, a collection of 74 Ableton Drift presets for deep house and tech house, accompanied by 75 audio loops, 61 MIDI loops and 63 Ableton Live clips.
Explore basses, pads, arpeggios, chords, keys, plucks, stabs, FX and synthesised drums. From the low end to melodic hooks and atmospheric layers, Novatron gives you sounds to build around, alongside musical ideas to get your sessions moving.