
A good sub bass gives a deep house track its foundation without taking over the arrangement. It needs to support the harmony, work around the kick and stop at the right moment. The waveform is only part of that sound: note length and envelope timing often make the bigger difference.
In this tutorial, we’ll build a rounded sub bass in Ableton Drift, program a two-bar groove and shape the result around a four-to-the-floor kick.
Start with a simple session
Set Live to 122 BPM, load Drift onto a MIDI track and create a two-bar clip. Add a kick on every beat on a separate track.
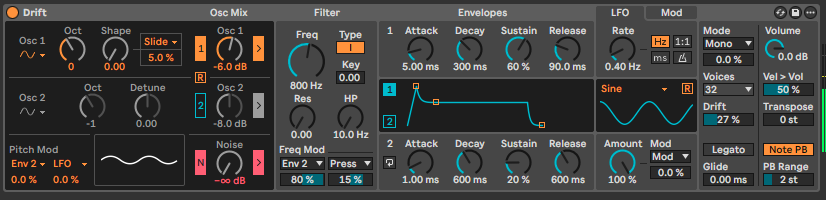
Start with these settings:
| Control | Setting |
|---|---|
| Voice mode | Mono |
| Legato | Off |
| Glide | 0.00 ms |
| Drift | 27% |
| Vel > Vol | 50% |
| Transpose | 0 st |
| Oscillator 1 octave | 0 |
| Oscillator 2 | Off |
| Noise | Off |
Keep Oscillator 1 routed through the filter. Set the high-pass filter to 10 Hz, then use the filter modulation settings described below.
These settings are a starting point. Adjust the patch with your drums playing and use the main Volume control to leave headroom.
1. Build the low end
Choose Sine for Oscillator 1, set Shape to zero and start with its gain around −6 dB.
Play A0 in Live’s piano roll. With octave and transpose at zero, this is approximately 55 Hz. It gives us a useful low starting note for a bassline in A minor.
Select Type I for the filter, with cutoff at 800 Hz, resonance at 0.00 and key tracking at 0.00.
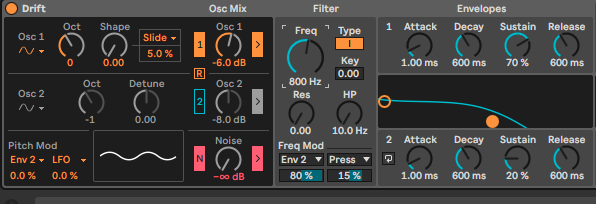
In the filter’s Freq Mod section, select Env 2 at 80%. Set Envelope 2 to a 1 ms attack, 600 ms decay, 20% sustain and 600 ms release, with cycling off. The second filter modulation source is Pressure at 15%; this adds a response when pressure messages are sent from a compatible controller.
A sine wave has very little upper harmonic content for the filter to shape. The filter movement becomes more apparent if you later try a brighter waveform. For this sub patch, focus on note length and the amplitude envelope.
Avoid adding a second oscillator immediately. First, make one oscillator work with the kick; you can judge any extra layer more clearly once that foundation is in place.
2. Shape the amplitude envelope
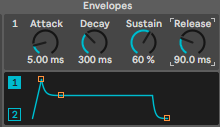
Set Envelope 1 as follows:
| Control | Starting value |
|---|---|
| Attack | 5 ms |
| Decay | 300 ms |
| Sustain | 60% |
| Release | 90 ms |
The short attack softens the start of each note. After reaching its peak, the sound falls towards the 60% sustain level. Release controls how long it takes to fade after the MIDI note ends. Sustain is displayed as a percentage in Drift.
Start with an eighth-note MIDI note and listen closely to its ending. At 122 BPM, an eighth note lasts approximately 246 ms, so this note ends before the 300 ms decay has completed. The release begins from the level reached at that moment.
This is why the MIDI clip and envelope need to be edited together. A short MIDI note can still produce a lingering sound when the release is long.
If you hear a click, increase attack or release slightly according to whether it happens at the beginning or end of the note. Then check that the bass still feels rhythmically clear.
3. Program a two-bar groove
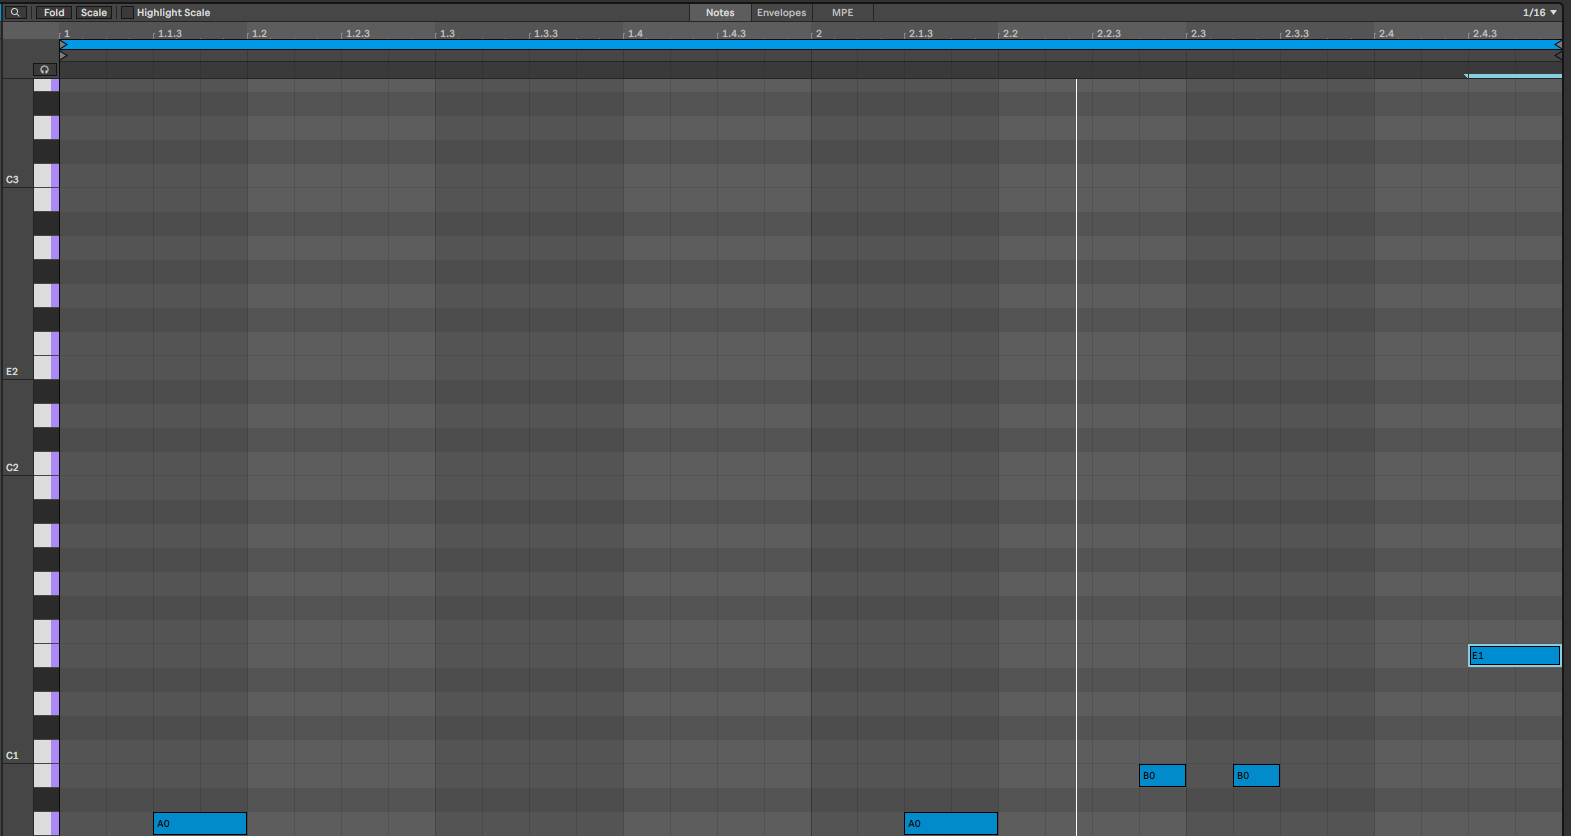
Create a two-bar pattern in A minor using A0, B0 and E1, as shown in the piano-roll image.
Use A0 as the low foundation, with short B0 notes adding movement in the second bar and E1 lifting the end of the phrase. Leave space between the notes so the drums can carry the groove.
Set Vel > Vol to 50%, matching the finished patch, so note velocity influences the bass level. Keep the root notes steady and use quieter velocities on the shorter notes for lighter movement.
Listen to where each note lands against the kick. Notes that start between kick hits can still extend underneath the next one because of their length and release. Judge the sound alongside the visible gaps in the piano roll.
4. Fit the bass around the kick
Loop the drums and bass together. First, shorten release until the bass stops cleanly enough for your groove. Then adjust individual MIDI note lengths to create contrast between held notes and short pickups.
If the kick has a long low tail, shorten that tail or leave more space in the bass pattern. If the kick is short, you may have room for a longer bass note.
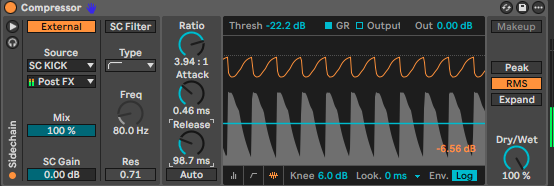
Try sidechain compression if you need further separation. Set it to reduce the bass when the kick hits, then adjust recovery so the next bass note arrives with the intended weight. Judge the amount in the full mix.
5. Add midrange clarity with a parallel aux
To give the bass more presence in the midrange, create a return track and add Erosion followed by Pedal. Send some of the bass signal to this aux, keeping the original bass channel playing alongside it.
Erosion adds texture to the return signal, while Pedal adds distortion and harmonic detail. Blending this processed layer with the original bass can make the line easier to follow on smaller speakers.
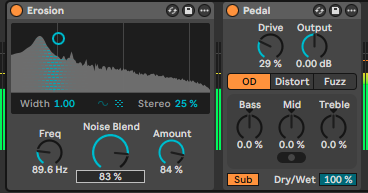
Use the settings shown in the image: Erosion’s Frequency at 89.6 Hz, Width at 1.00, Stereo at 25%, Noise Blend at 83% and Amount at 84%. Set Pedal to OD, with Drive at 29%, Output at 0.00 dB, the three tone controls at 0.0% and Sub enabled. Keep Pedal’s Dry/Wet at 100%, using the bass send and return level to control the blend.
Start with the bass send turned down, then raise it gradually while the drums play. Bring in enough of the processed signal to hear the notes more clearly without letting the texture dominate.
Mute and unmute the return to check its contribution. Listen to the low end as well as the midrange: this return still carries low-frequency energy, particularly with Pedal’s Sub switch enabled. If the bass becomes too heavy, reduce the return level or compare with Sub switched off.
6. Add the final Drift setting
Keep Drift at 27%, as set at the start. This introduces variation into the patch; compare it with zero while the bass and drums play to hear what it contributes, then return it to 27% for the finished sound.
Keep Mono mode selected, Legato off, Glide at 0.00 ms and Transpose at 0 st. Leave oscillator retrigger R enabled and both pitch modulation amounts at 0.0%, as shown in the final patch. The main Volume is 0.0 dB in this example; adjust it to suit the level in your own session.
Save the finished sound
Save the Drift patch and keep the aux chain in your Live set. Adjust the send level as the arrangement develops, adding more texture where the bass needs definition and pulling it back where the sub alone gives enough support.
For more starting points, explore Novatron, Mind Flux’s Ableton Drift preset pack for deep house and tech house. Use the envelope and MIDI techniques from this tutorial to fit each sound around your own track.

FAQs
-
Start with a single sine-wave oscillator, switch Drift to Mono and turn off Oscillator 2 and Noise. Use a short amplitude attack and a controlled release, then program a bassline with space between the notes. Adjust the MIDI note lengths and envelope while listening alongside your kick.
-
Try a 5 ms attack, 300 ms decay, 60% sustain and 90 ms release. These are starting points: shorter notes and releases create a tighter groove, while longer settings let the bass sustain between drum hits.
-
In this Ableton Live example, A0 produces approximately 55 Hz with Drift’s oscillator octave and transpose set to zero. This works as the root of our A minor bassline. Choose the register to suit your track’s key and check that the lowest notes remain clear alongside the kick.
-
Start by adjusting the bass note lengths and release so the low end does not linger unnecessarily beneath the kick. Listen to the kick’s tail too, as a long kick can leave less room for the bass. Use sidechain compression if you need additional separation.
-
Add a little harmonic content alongside the clean sub. In this tutorial, a parallel return containing Erosion and Pedal adds texture and distortion. Blend it in gradually until the notes become easier to follow without overwhelming the original bass.
-
Very fast changes in level can cause clicks. If the click happens at the beginning, increase the amplitude attack slightly. If it happens at the end, increase the release a little, then check that the extra tail still fits the groove.
-
Glide is optional. This patch uses Mono mode with Legato off and Glide at 0.00 ms for separate, clearly defined notes. Once the basic groove works, experiment with glide if you want slides between pitches.

Mind Flux presents Novatron, a collection of 74 Ableton Drift presets for deep house and tech house, accompanied by 75 audio loops, 61 MIDI loops and 63 Ableton Live clips.
Explore basses, pads, arpeggios, chords, keys, plucks, stabs, FX and synthesised drums. From the low end to melodic hooks and atmospheric layers, Novatron gives you sounds to build around, alongside musical ideas to get your sessions moving.