Crafting a Riser with u-he Diva: A Step-by-Step Guide

Risers are pivotal in electronic music production, serving as a bridge to elevate energy and anticipation before a drop or transition. While there are various ways to create risers, using u-he Diva offers a unique approach, thanks to its rich, analog-sounding synthesis capabilities. This article provides a comprehensive walkthrough on crafting a compelling riser with Diva, perfect for producers looking to infuse their Tech House tracks with depth and warmth.
Step 1: Initialize Your Patch in Diva

Open u-he Diva in your DAW and select a new init patch to start with a clean slate. This ensures that your riser sound is uniquely yours, built from the ground up.
Choose a Template: For risers, the "Templates > Basic (Init)" patch is a great starting point, offering a straightforward analog synth sound to build upon.
Create a MIDI Clip: Lay down a single, sustained note in a new MIDI clip. This note will serve as the foundation of your riser. The duration of the note should match the intended length of your riser, typically ranging from 4 to 8 bars to align with the build-up section of your track.
Add Pitch Bend Automation: To infuse your riser with a dynamic sense of movement and tension, automate the pitch bend in your MIDI clip. Start with the pitch at its original position and gradually increase the bend amount over the course of the riser. This will create a sweeping effect that contributes to the rising sensation. Be mindful of the pitch bend range settings in Diva to ensure the automation aligns with the desired pitch movement.
Step 2: Select Your Oscillator and Waveform

Oscillator Module: Navigate to the Oscillators section. Diva's oscillators are modeled after classic analog synths, each offering a distinct sonic character.
Waveform Selection: Choose a sawtooth wave for its rich harmonic content. Sawtooth waves provide a full, bright sound, ideal for a riser that needs to cut through the mix.
Step 3: Shape the Sound with Filters

Filter Module: Move to the Filters section. Filters are crucial for sculpting the frequency content of your riser, allowing you to control its texture and movement.
High-Pass Filter: Set up a high-pass filter to gradually remove lower frequencies, making the riser sound thinner and more focused as it ascends. Automate the cutoff frequency to sweep upwards over time.
Step 4: Add Movement with Modulation
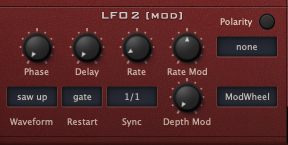
LFO for Pitch Modulation: Utilize one of Diva's LFOs (Low Frequency Oscillators) to modulate the pitch of your oscillator, adding a sense of movement and excitement. Set the LFO to a slow rate and map it to the oscillator's pitch with a subtle depth, so the pitch varies slightly over time, creating a more dynamic sound.
Envelope for Filter Cutoff: Use an envelope to automate the filter's cutoff frequency. A slow attack time will make the filter open gradually, creating the classic riser effect that builds tension over time.
Step 5: Enhance with Effects

Reverb and Delay: Adding reverb and delay effects can significantly enhance the spatial qualities of your riser, making it more immersive. Diva's built-in effects are sufficient for this purpose, but don't hesitate to experiment with external plugins for different textures.
Modulation Effects: For an even richer sound, consider adding a chorus or phaser effect. These modulation effects can add width and depth to your riser, making it more prominent in the mix.
Step 6: Automate the Rise
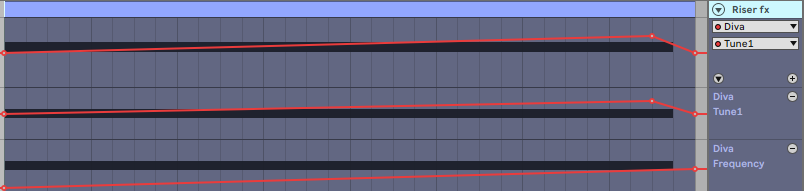
Automate Parameters: The key to a successful riser is automation. Automate the pitch, filter cutoff, and effects parameters to increase over the length of your riser, typically 4 to 8 bars. This gradual increase in parameters will create the rising effect that builds tension leading up to a drop.
Step 7: Fine-Tuning and Mixing

Volume and Placement: Ensure your riser sits well in the mix by adjusting its volume and panning. It should enhance the build-up without overwhelming the other elements of your track.
EQ Adjustments: Use EQ to carve out space for your riser, ensuring it doesn't clash with other mix elements, particularly in the low-end frequencies.
Conclusion
Creating a riser with u-he Diva not only adds anticipation and energy to your tracks but also brings a touch of analog warmth and character often missing from digital productions. By following these steps and embracing experimentation, you can craft risers that not only serve their functional purpose but also contribute to the overall sonic identity of your music.
Remember, the beauty of synthesis is in the exploration, so don't be afraid to deviate from this guide and experiment with Diva's vast sound design possibilities. Happy producing!