How To Beef Up Your Drums Part 2

How-To-Beef-Up-Your-Drums-Prt-2.png

In our last blog post, we looked at EQing our drums to bring out certain frequencies and enhance the loop, now let's look at adding some of that 'beef' with compression. 

Why do we add compression to drums? Basically, we add compression to gel and tighten the sounds and make sure the loop is really pumping the kick. To achieve this, we will need to look closely at the 'release' and 'attack' time - which is often sadly overlooked. 

To start let's look at EQ Sidechain (another overlooked setting in compression). We can use this decided what frequencies are to be compressed and which ones will not be. So, open up your side chain section, switch on the EQ side chain and set the EQ mode to high pass. 

Comp-EQ-Sidechain.jpg

This lets all the frequencies above your freq setting pass into the compressor, and all the frequencies below be bypassed (note, they will still be heard). Set your frequency between 100Hz and 200Hz. 

Now, to understand what each parameter does, crank them all up to their full value (while remembering to take off the makeup gain). This will give us a hugely distorted pile of mush. 

Comp-Mush.jpg

Don’t worry you don't have to listen to your loop like this for long! 

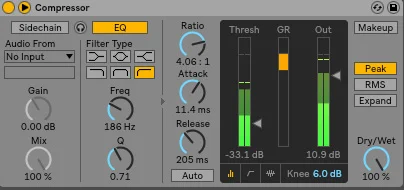
To help move us forward let's look at the release. The release is done in time, so it can essentially be set as a note value. Bear in mind for each tempo this will be slightly different time value to achieve for example a 1/8 note. 

You might be wondering why this is important? In short, it is one of the main factors that give our drums that professional pumping sound and punchiness! We can decide how long the release is held for, for example, 1/16, a 1/8 or a 1/2. (Note, the longer time values may add a sloppiness to your drums, so we recommend sticking to smaller/ shorter note/time values). 

This may seem a little overwhelming but there is a great tool we can use to help us and that is a delay calculator. And there is a great one via Nick Fever’s site. Simply type in your tempo and it will give you all you all the time values for each note value. 

Since the tempo of our loop is at 123bpm the time values for a 1/16 and 1/8 note are 1/16 = 121ms and a 1/8 = 244ms. With this information, we are going to set our release between these times. Also, try setting it long so you can start to hear your loop become sloppy. This will allow you to see why you would not do this. 

Side note, you will also slowly start to hear the distortion fade away as you increase the release amount. 

Release-Comp.jpg

Now move on to the attack. For this we are going to allow the transients through to help add some more snap and punch to our various drums sounds. (You may have to pull the output gain down here). The best way to find the right setting is slowly turn up your attack time, you will find that for drums between 6ms and 15ms is normally perfect. 

comp-attack.jpg

Pull down the output gain to 0dB and the ratio to around 4:1 - 8:1 (which is a great zone for drums). From there, pull up the threshold until you get around 8-12dB gain reduction, (that is the big orange line in the middle). For around 10dB it is a third of the way down. Gain reduction is often found by setting the threshold just below the dark green section. Once that is set, turn up your output gain to match the gain reduction, so if you have 10dB gain reduction turn of your output gain to 10dB.

Final-Comp.jpg

Now that all the hard work is done, let's add some tone and texture to our loop using the various harmonic tools in Ableton. 

One of the great additions to Live 9.7 was the filter circuits. To add this to our loop, load in the auto filter and set the frequency to full to ensure we don’t dampen our high frequencies. Now set the filter circuit you want and drive it a little. 

Filter-Circuit.jpg

Let’s also add the saturator! This will help to power our loop a little more. Set to analog clip and push it a little. It is always useful to switch on the soft clip.

Sat.jpg

And thats that, we have taken some lush 909 sounds and really beefed them up allowing then to generate a huge amount of power that can make your tracks sound huge in the club. 

Tune back in for our next blog post where we look at making a snare with Ableton’s Operator.