How to Create a Reese Bass in Ableton

Introduction
Creating a Reese Bass in Ableton is a routine task for those immersed in the world of music production and sound design. This distinctive sound, which owes its name to Kevin 'Reese' Saunderson, is a cornerstone in a wide array of genres, most notably drum and bass and dubstep.
The Reese Bass sound originated from Kevin Saunderson's track "Just Want Another Chance" under his Reese alias, released in 1988. The track featured a unique, pulsating bass sound that was created using the Casio CZ-5000, a phase distortion synthesizer. This sound was achieved by layering two detuned sawtooth waves, creating a phasing effect that gives the Reese Bass its characteristic 'moving' sound.
The Reese Bass sound didn't receive immediate recognition, but it eventually found its way to the UK where it was sampled by Ray Keith for the jungle classic, "Terrorist," under his moniker Renegade. This marked the breakout moment for the Reese Bass sound, and it became a defining element in the drum & bass movement in the UK. Over time, the sound has been adopted and adapted by many producers, becoming a staple in electronic music production.
In this article, our aim is to shed light on the importance of the Reese Bass, guide you through the process of crafting it in Ableton, and offer valuable tips to fine-tune your sound. We'll be using Ableton's Analog synthesizer, a versatile tool that can effectively recreate the Reese Bass sound. Whether you're a seasoned producer or just starting out, this guide will provide you with the knowledge and techniques to create this iconic sound in your own productions. Let's dive in.
What is a Reese Bass, and Why Does it Matter?

So, what exactly is a Reese Bass and why does it command such significance? A Reese Bass is a distinctive type of synthesized sound, noted for its rich, buzzing texture and its dynamic movement. It's conceived through the process of detuning two or more oscillators against each other, which results in a pronounced phasing effect. This effect creates a 'moving' sound, a characteristic that has become synonymous with the Reese Bass.
The Reese Bass sound holds a pivotal role across various electronic music genres, from drum and bass to dubstep and beyond. Its unique sonic character has the ability to add depth and movement to a track, making it a popular choice among music producers. Furthermore, the process of creating a Reese Bass involves several key synthesis techniques, such as oscillator detuning and the use of effects like chorus and saturation. Mastering these techniques not only allows you to create the Reese Bass sound but also broadens your overall sound design skills.
In essence, the Reese Bass is more than just a sound; it's a testament to the endless possibilities of electronic music production. Gaining proficiency in creating this sound can considerably elevate your music production skills, opening up new avenues for creativity and innovation.
How to Create a Reese Bass in Ableton

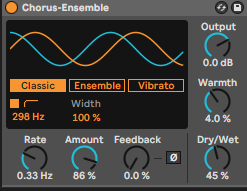
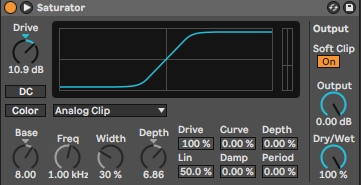
Creating a Reese Bass in Ableton is a journey into the heart of sound design. This process involves a series of steps that gradually shape and mold the sound into the rich, buzzing texture that characterizes the Reese Bass. In this section, we'll guide you through these steps, using Ableton's Analog synthesizer as our primary tool. From setting up oscillators and applying detuning to adding effects like chorus and saturation, each step brings us closer to achieving that iconic Reese Bass sound. We'll also delve into how to add a sub oscillator to further enrich the sound. Let's dive in and start creating.
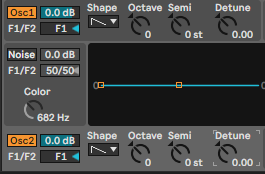
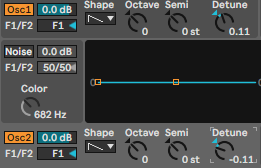

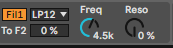

And there you have it - the art of creating a Reese Bass in Ableton. By following these steps, you've embarked on a journey into the heart of sound design, shaping and molding your sound into the rich, buzzing texture that characterizes the iconic Reese Bass. From setting up oscillators and applying detuning, to adding effects like chorus and saturation, you've gradually built up your sound, each step bringing you closer to achieving that distinctive Reese Bass sound.
Tips and Reminders for Creating a Reese Bass

As you embark on the journey of creating a Reese Bass in Ableton, there are several tips and reminders that can guide you along the way. These suggestions are not just about following a set of rules, but rather about exploring the vast sonic landscape that lies before you. From experimenting with different waveforms and using EQ to shape your sound, to layering sounds for richness and modulating parameters over time for movement, each tip offers a unique avenue for creativity. This section also highlights the importance of adding effects for character, using sidechain compression for rhythm, and experimenting with stereo width for immersion. Remember, these are just starting points. The true magic lies in your ability to experiment and make the sound your own. So, let's dive in and explore these tips in more detail.
Experiment with Different Waveforms: While the sawtooth wave is a common choice for creating a Reese Bass due to its bright and buzzy character, don't limit yourself to it. Experiment with other waveforms such as square, triangle, or even complex waveforms. Each waveform has its own unique character and can bring a different flavor to your Reese Bass.
Use EQ to Shape the Sound: Equalization is a powerful tool in shaping your sound. Use it to boost or cut specific frequencies to help your Reese Bass fit better in your mix. For example, you might want to cut some of the low frequencies if your track already has a heavy kick drum or boost the mid frequencies to make your Reese Bass stand out more.
Layer Sounds for Richness: Don't hesitate to layer multiple Reese Bass sounds together. This can create a fuller, richer sound with more depth and complexity. You can layer the same sound with different settings or even different sounds altogether. The key is to find a balance where each layer contributes to the overall sound without overpowering the others.
Modulate Parameters Over Time for Movement: Adding movement to your Reese Bass can make it more interesting and dynamic. This can be achieved by modulating parameters like filter cutoff, detune amount, or oscillator mix over time. You can do this manually by automating these parameters in Ableton or use a modulation source like an LFO or envelope.
Add Effects for Character: Effects like distortion, reverb, delay, or phaser can add interesting characteristics to your Reese Bass. Distortion can add grit and intensity, reverb can create a sense of space, delay can add rhythmic complexity, and phaser can enhance the phasing effect of the detuned oscillators. Don't be afraid to experiment with different effects and settings to find what works best for your sound.
Use Sidechain Compression for Rhythm: If your Reese Bass is clashing with your kick drum or other rhythmic elements, consider using sidechain compression. This technique allows the Reese Bass to 'duck' out of the way when the kick drum hits, creating a rhythmic interaction between the two and giving your track a more cohesive feel.
Experiment with Stereo Width for Immersion: Playing with the stereo width of your Reese Bass can make it sound larger and more immersive. You can do this by using stereo widening effects or panning different layers of your Reese Bass. However, be careful not to go too wide as this can cause issues in mono playback, which is important for club sound systems.
Remember, these are just starting points. The key to making the Reese Bass sound your own is experimentation and creativity. Don't be afraid to break the rules and try new things. The most important thing is that you like the sound you're creating.
Mastering the creation of a Reese Bass in Ableton is an invaluable skill set for every music producer or sound designer. By adhering to these outlined steps and suggestions, you're well on your way to forging your own unique Reese Bass soundscapes. Always remember, the secret sauce to a remarkable Reese Bass lies in the realm of experimentation - so, don't hesitate to explore different techniques until you find the perfect fit for your musical style.
Are you eager to delve deeper into the world of music production with Ableton? If so, our comprehensive Ableton courses is just the thing for you. It's packed with a wealth of tips and tricks that will further enhance your production skills. So, why wait? Start your journey to becoming an Ableton maestro today!