
Creating Dark Techno Leads with Thor in Reason Rack

Dark techno leads are often used to add intensity and energy to a track. These sounds typically combine aggressive oscillators, layered modulation, distortion, and spatial effects to create tones that cut through a dense mix.
In this tutorial we’ll design a dark techno lead using Thor inside the Reason Rack Plugin.
The goal is to create a lead sound that is:
Aggressive and powerful
Rich in harmonic content
Constantly evolving through modulation
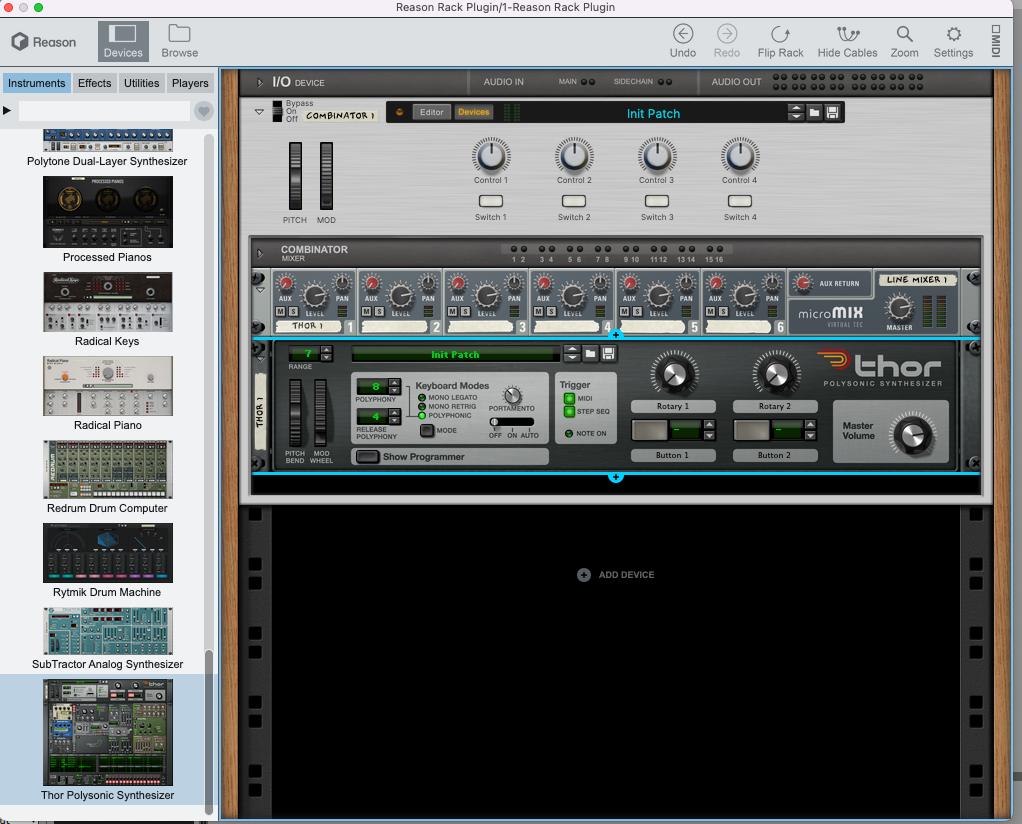
Step 1 – Start with a Combinator and Mixer
Begin by creating a clean rack structure.
Load the following devices:
Reason Combinator
Line Mixer (microMIX)
Thor
The Combinator keeps the rack organised and allows multiple devices to be controlled together. The mixer allows you to easily route effects and aux sends later in the sound design process.
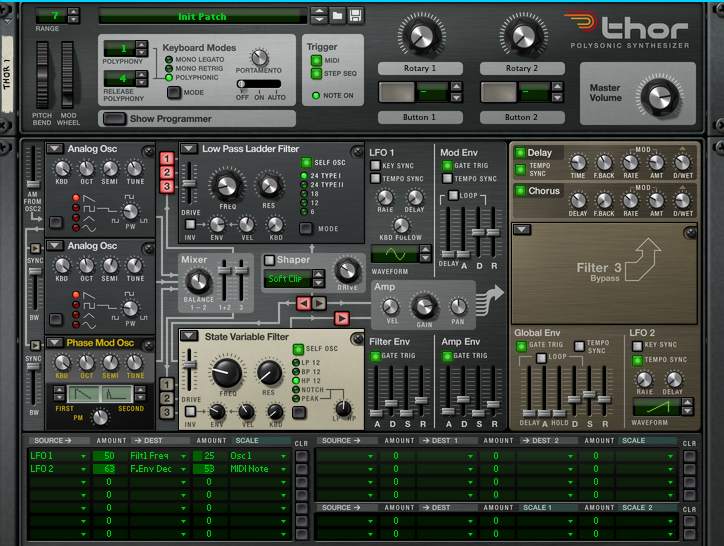
Step 2 – Configure the Oscillators
Now we’ll build the main tone of the lead sound using Thor’s oscillator section.
Configure the oscillators as follows.
Step 2 – Configure the Oscillators
Next we’ll build the core tone of the lead sound using the oscillator section inside Thor.
Thor allows multiple oscillator types to be layered together, which makes it ideal for creating thick, aggressive lead sounds.
Oscillator 1 – Analog Oscillator
Add an Analog Oscillator and set the waveform to Saw.
Settings:
Waveform: Saw
Detune: -10
The saw wave provides strong harmonic content, giving the sound a solid foundation.
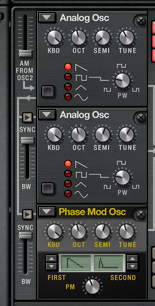
Oscillator 2 – Analog Oscillator
Add a second Analog Oscillator, also set to Saw.
Settings:
Waveform: Saw
Detune: +10
Semitone: +7
Detuning the oscillators slightly creates width and movement, while the semitone shift adds extra harmonic depth.
Oscillator 3 – Phase Modulation Oscillator
For additional texture, add a Phase Modulation Oscillator.
Settings:
Osc A: Saw
Osc B: Pulse Saw
Detune: -10
Semitone: +7
This oscillator introduces additional harmonic complexity that helps the lead cut through the mix.
Layering these three oscillators creates a thicker and more harmonically rich sound, forming a strong foundation for the rest of the patch.
Step 3 – Shape the Sound with Filters
Now we can begin sculpting the tone of the sound using the filter section inside Thor.
Thor allows multiple filters to be routed together, which is extremely useful when designing darker techno sounds. By combining filters, we can remove unwanted frequencies while keeping the sound aggressive and focused.
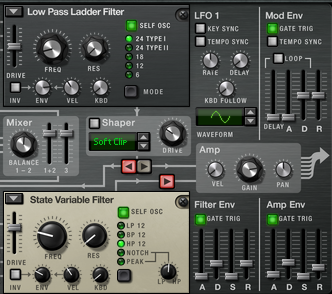
Filter 1 – Low Pass Ladder Filter
Start by configuring Filter 1.
Set the filter type to:
Low Pass Ladder Filter
Then choose the mode:
LP 24
The LP 24 mode is a 24 dB per octave low-pass filter, which means it removes high frequencies very aggressively. This type of filter is commonly used in analog synthesizers and works particularly well for shaping techno sounds.
Suggested starting settings:
Drive: moderate
Frequency: around the mid position
Resonance: low
The drive control adds subtle saturation, which can help the sound feel more aggressive and harmonically rich.
At this stage the filter is mainly being used to tame the brightness of the oscillators and keep the sound focused.
Routing Filter 1 into Filter 2
Next we will route the signal from Filter 1 into Filter 2.
Thor allows different filter routing configurations. In this case we want the signal to pass through both filters sequentially.
This means the signal flow becomes:
Oscillators → Filter 1 → Filter 2 → AmplifierUsing filters in series gives you much more control over the tonal balance of the sound.
Filter 2 – High Pass Filter
Now configure Filter 2.
Set the filter type to:
High Pass Filter
A high-pass filter removes low frequencies from the signal. This is useful for lead sounds because it prevents the lead from interfering with the bass and kick drum.
Suggested starting settings:
Frequency: low to mid range
Resonance: low
Drive: subtle
You only want to remove enough low end so the lead sits comfortably above the bassline.
Why This Filter Combination Works
By combining a low-pass filter followed by a high-pass filter, we create a kind of band-pass effect.
This filtering approach:
removes excessive high frequencies
removes unnecessary low frequencies
keeps the sound focused in the mid range
For techno leads, this is ideal because it allows the sound to cut through the mix without clashing with the kick or bass.
It also gives us a controlled frequency range that can later be modulated with LFOs and envelopes to create movement.
Step 4 – Configure the Filter and Amplifier Envelopes
Set the envelopes to create a controlled but expressive lead sound.
Filter Envelope
Suggested settings:
Attack: fast
Decay: medium
Sustain: mid
Release: short
Amplifier Envelope
Suggested settings:
Attack: fast
Decay: medium
Sustain: mid
Release: short
These settings allow the lead sound to open quickly and settle into a controlled sustain.
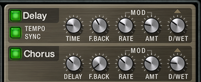
Step 5 – Add Chorus and Delay
Now add some spatial effects to give the sound width and depth.
Enable Thor’s built-in chorus and delay effects.
Suggested settings:
Chorus
Delay: low
Feedback: low
Amount: moderate
Dry/Wet: subtle
Delay
Tempo synced
Feedback: moderate
Amount: low to moderate
Dry/Wet: subtle
These effects help the lead feel wider and more atmospheric.
Step 6 – Add LFO Modulation
To add movement to the sound, configure LFO 1 and LFO 2.
Use the modulation matrix to route the LFOs.
Example routing:
LFO 1 → Filter Frequency
LFO 2 → Filter Envelope Decay
This modulation keeps the lead sound evolving over time rather than remaining static.
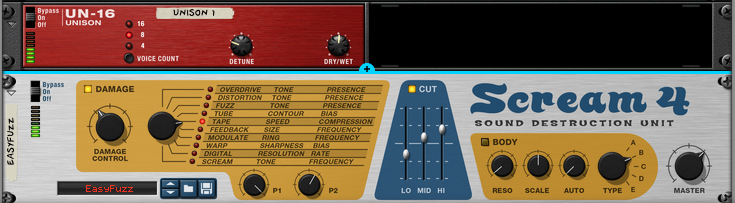
Step 7 – Add Unison and Distortion
Next we’ll add some processing after Thor to increase the size and aggression of the sound.
Add:
UN-16 Unison
Scream 4
Unison Settings
Voice count: 16
Detune: moderate
Scream 4 Settings
Set the distortion mode to:
Tape
This combination thickens the sound while adding harmonic saturation.
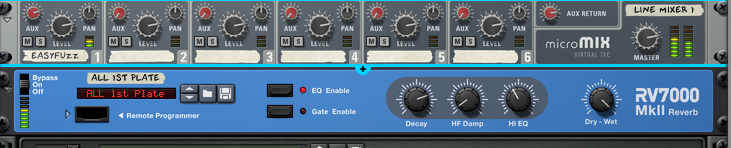
Step 8 – Add Plate Reverb
To place the lead sound into a wider space, add reverb through the mixer’s aux channel.
Use RV7000 MkII.
Select a Plate reverb preset.
Suggested settings:
Decay: moderate
HF Damp: moderate
Hi EQ: adjusted to taste
Using aux reverb keeps the original signal clean while adding space.
Step 9 – Add Pulsar LFO for Additional Movement
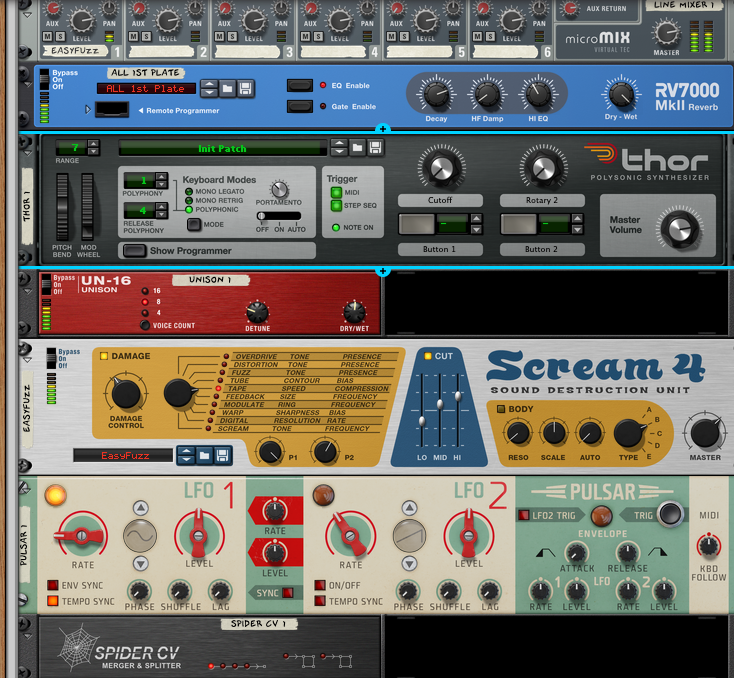
To add more complex modulation, introduce Pulsar LGM-1.
Use both LFOs inside Pulsar and combine them using Spider CV.
Merge the two LFO signals and route the output to Rotary 1 on Thor.
Earlier in the patch, Rotary 1 was mapped to filter cutoff, so the merged LFO signal now modulates the filter movement.
This produces evolving filter movement that helps the lead feel more organic and dynamic.
Final Thoughts
Designing powerful techno leads often involves combining multiple synthesis techniques and layers of modulation.
Using Thor inside the Reason Rack Plugin allows you to create complex sound design setups that include:
layered oscillators
multiple filter stages
evolving modulation
distortion and spatial effects
By experimenting with these techniques, you can create lead sounds that feel aggressive, dynamic, and perfectly suited for modern techno production.


Learn how to design dark techno leads using Thor in the Reason Rack Plugin. This tutorial covers oscillator layering, filter routing, LFO modulation, distortion, and effects to create aggressive techno lead sounds.