How to Make a Melodic Techno Pluck Bass in BABY Audio BA-1
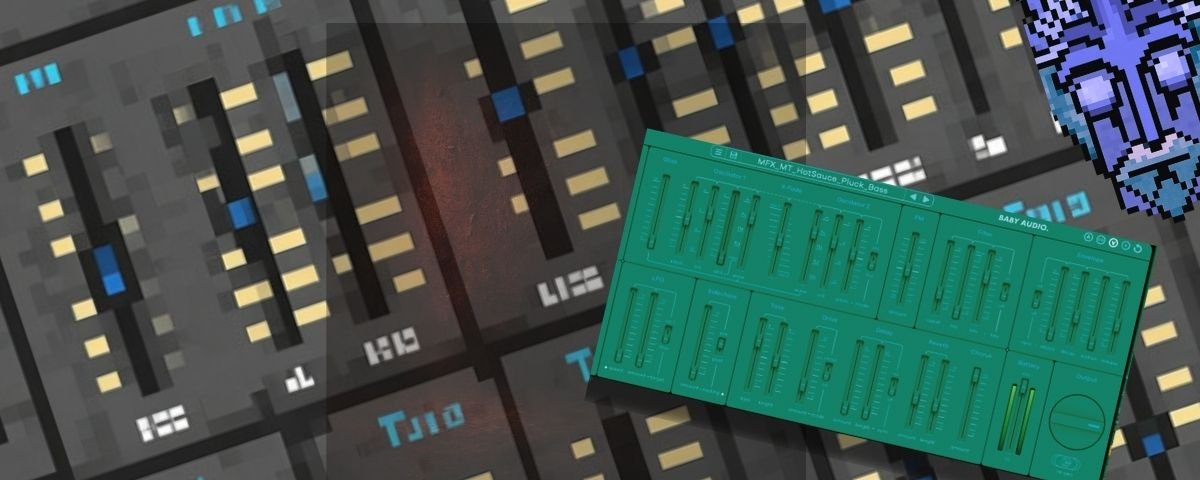
A strong pluck bass can provide both rhythm and melody in a melodic techno track. The short envelope helps it lock into the groove, while detuned oscillators, chorus and saturation give it enough width and character to carry the main bassline.
In this tutorial, we’ll create a warm melodic techno pluck bass using BABY Audio BA-1. We’ll build the patch from an initialised preset before adding movement, drive and some additional processing with Ableton Live’s stock effects.
Tempo: 130 BPM
Synth: BABY Audio BA-1
Style: Melodic techno pluck bass
1. Initialise BA-1
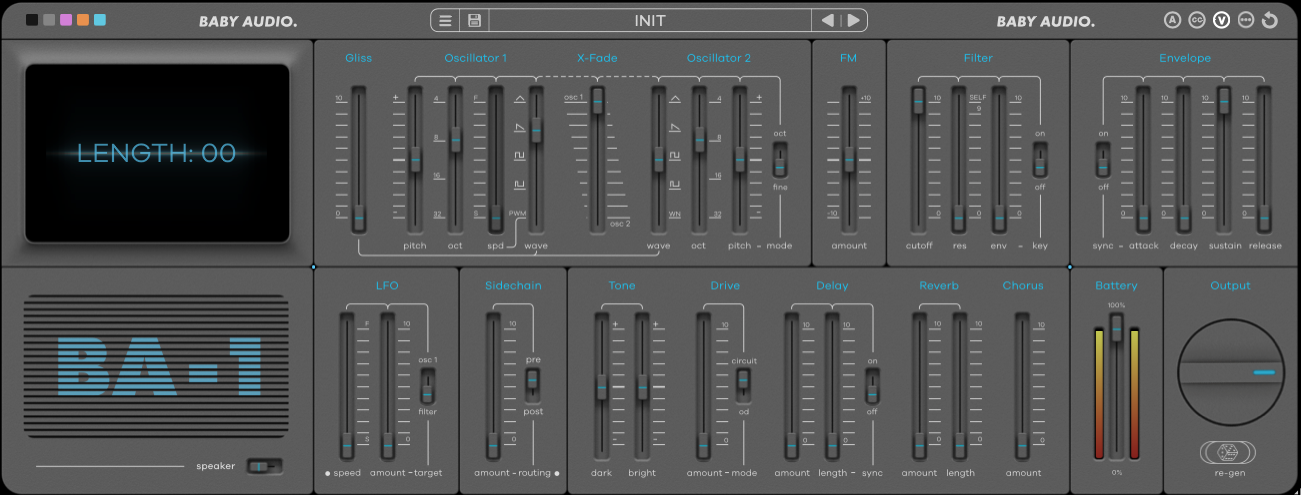
Start by loading BA-1 onto a new MIDI track in Ableton Live.
Select the Init preset so that you are beginning with a clean patch, then set the project tempo to 130 BPM.
Starting from an initialised preset makes it easier to understand how each part of the sound is being created. It also prevents any hidden modulation or effects from affecting the final result.
2. Set Up the Oscillators
The foundation of the sound comes from two saw waves.
Set the oscillator section as follows:
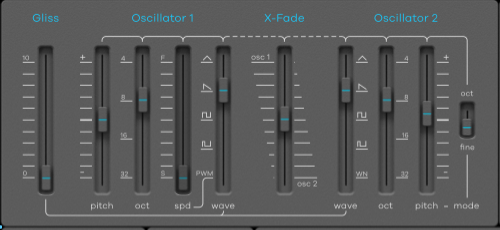
Oscillator 1: Saw wave
Oscillator 2: Saw wave
X-Fade/Mix: 0
Oscillator 2 Detune: +10
The first oscillator provides the main body of the bass. The second saw wave is slightly detuned, creating extra width and movement around the central pitch.
A small amount of detuning is enough here. Increasing it too far can make the bass lose focus and become difficult to balance against the kick.
3. Program the MIDI Pattern
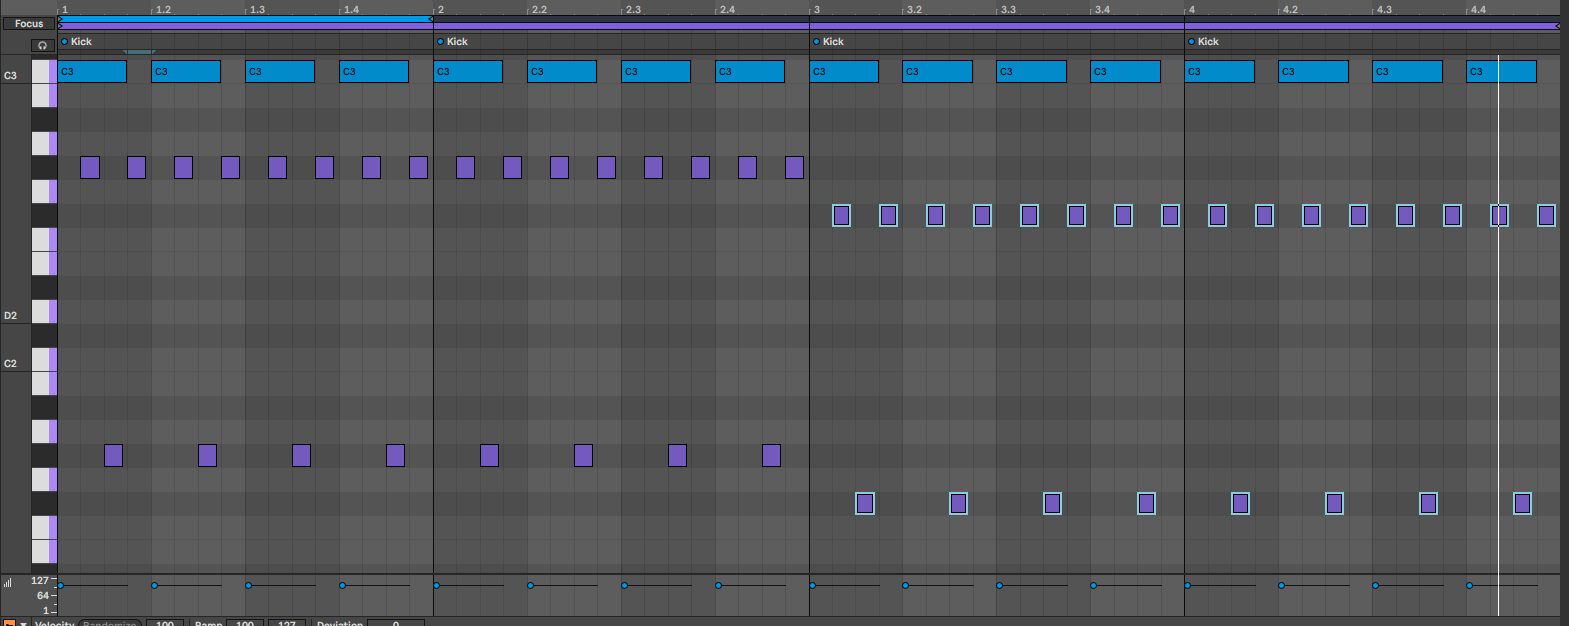
Next, create a simple MIDI pattern that works around the kick drum.
Keep the notes short and leave enough space between them for the kick to come through clearly. The bassline should feel connected to the groove rather than playing continuously underneath it.
Start with the root note of your track and use repetition to establish the rhythm. You can then introduce a lower or higher note to create variation across the phrase.
The exact notes will depend on the key of your track, but the most important part is the relationship between the bass and the kick.
MIDI programming tips
Keep the note lengths consistent at first. Short notes will make the envelope feel more controlled and percussive.
Once the basic groove is working, experiment with:
Moving occasional notes up or down an octave
Removing a note at the end of every second or fourth bar
Changing the velocity of selected notes
Adding a small variation before the pattern repeats
These subtle changes can stop the bassline from feeling overly mechanical without making the pattern too complicated.
4. Shape the Sound With the Filter
The pluck character is created by combining a low-pass filter with a short envelope.
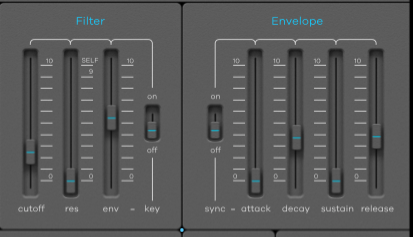
Set the filter controls to approximately:
Filter type: Low-pass
Cutoff: 24
Envelope amount: 66
The low cutoff removes much of the brightness from the sustained sound. The positive envelope amount then opens the filter briefly whenever a note is triggered.
This creates the bright initial attack followed by the darker body that gives the patch its plucked quality.
5. Adjust the Envelope
Set the main envelope as follows:
Attack: At or close to 0
Decay: 36
Sustain: 0
Release: 36
The fast attack allows the transient to begin immediately. Setting the sustain to zero means the sound quickly fades after each note is triggered, while the moderate decay and release prevent it from becoming too dry or clicky.
The release setting also helps consecutive notes blend together slightly. However, the bass should still have enough space between notes to preserve the groove.
When adjusting the decay, listen to the sound alongside the kick. A longer decay creates a fuller and more melodic result, while a shorter decay produces a tighter, more percussive bass.
6. Add Chorus and Reverb
Once the basic pluck is working, use BA-1’s internal effects to add width and atmosphere.
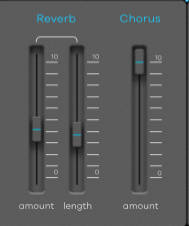
Turn the Chorus amount up fully, then introduce a small amount of Reverb.
The chorus spreads the detuned saw waves across the stereo field and gives the upper harmonics a wider, more animated character. The reverb adds a subtle sense of space around each note.
Keep the reverb controlled. Too much ambience can soften the transient and cause the bass to overlap with the following kick.
If the chorus makes the lowest frequencies feel unstable, keep a separate sub layer in mono or use a utility device after BA-1 to control the stereo width of the low end.
7. Add Drive and Darken the Tone
Next, add some internal drive to make the patch sound thicker and more aggressive.
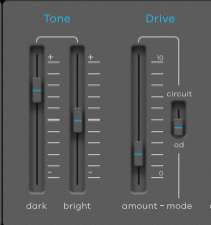
Set the controls to:
Drive: 21
Dark tone: +50
The drive adds harmonics and helps the bass feel denser without requiring another oscillator. Turning up the dark tone keeps those additional harmonics controlled so that the sound remains warm rather than becoming harsh.
This balance is particularly useful in melodic techno, where the bass needs enough presence to cut through the mix without competing with leads, arpeggios and atmospheric elements.
8. Introduce Battery Chaos
Add a small amount of Battery Chaos to give the sound a less static character.
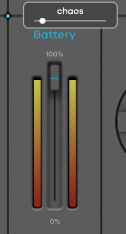
This introduces a touch of imperfection and movement, helping the patch feel more like an unstable piece of analogue hardware.
Only a small amount is needed. The goal is to create variation between notes without making the tuning or volume feel unpredictable.
9. Add Saturation in Ableton Live
For some additional weight, place Ableton Live’s Saturator after BA-1.
The example uses the following settings:
Mode: Analog Clip
Drive: 8.6 dB
Output: -6.6 dB
Dry/Wet: 100%
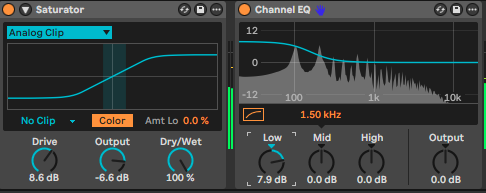
The additional drive brings out the midrange harmonics and helps the pluck sound more solid on smaller speakers.
Reducing the output level compensates for the added gain. Always compare the processed and unprocessed versions at a similar volume, as a louder signal can appear better even when the processing is not actually improving the sound.
10. Strengthen the Low End With Channel EQ
After Saturator, add Ableton Live’s Channel EQ.
In this example, the low control is boosted to approximately +7.9 dB. This adds extra weight underneath the pluck and gives it a fuller bass response.
Treat this value as a starting point rather than a fixed rule. The amount of boost required will depend on:
The notes used in your bassline
The tuning of the kick
Whether you are using a separate sub layer
The amount of low end already introduced by Saturator
Listen to the bass and kick together. If the groove becomes muddy or loses punch, reduce the low-frequency boost rather than continuing to increase the volume.
11. Add Optional Bite With Overdrive
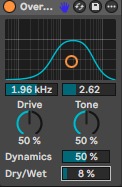
For more bite in the upper-mid frequencies, add Ableton Live’s Overdrive effect at the end of the chain.
The example settings are:
Filter frequency: 1.96 kHz
Bandwidth: 2.62
Drive: 50%
Tone: 50%
Dynamics: 50%
Dry/Wet: 8%
The low Dry/Wet setting blends a small amount of the distorted signal with the original sound. This helps the attack become more noticeable without turning the entire bassline into an aggressive distorted layer.
Adjust the filter frequency to target the area that gives the pluck its character. Moving it lower will produce a heavier result, while moving it higher will emphasise the click and attack.
Final Mixing and Arrangement Tips
Once the sound is complete, test it against the full drum groove rather than listening to it in isolation.
Use sidechain compression or volume shaping to create space for the kick. The gain reduction does not need to be extreme—the bass only needs to move out of the way during the kick transient.
You can also automate the BA-1 filter cutoff throughout the arrangement. A darker setting can work well during the introduction, while gradually opening the filter can create energy before a breakdown or drop.
Try reducing the reverb during the main drop for a tighter sound, then increasing it during breakdowns and transitions. This allows the same patch to perform different roles throughout the track.
Final Result
The completed patch combines two detuned saw waves with a fast filter envelope, creating the short and rhythmic character needed for a melodic techno pluck bass.
BA-1’s chorus, drive and Battery Chaos add width and analogue-style movement, while Ableton’s Saturator, Channel EQ and Overdrive provide the final weight and presence.
The settings are a useful starting point, but small adjustments to the decay, filter cutoff and MIDI note length can completely change how the patch interacts with your track.









FAQs
-
A melodic techno pluck bass usually combines a short envelope with enough low-end weight to support the track. The fast attack and low sustain create the rhythmic pluck, while saturation and controlled effects give it warmth, width and presence.
-
Yes. The main sound is created inside BABY Audio BA-1 using its oscillators, filter, envelope and effects. Ableton’s Saturator, Channel EQ and Overdrive are used for additional processing, but similar saturation, EQ and distortion plugins can be substituted.
-
Shorten the decay and release, reduce the MIDI note lengths and use less reverb. You can also lower the filter-envelope amount slightly if the attack feels too bright or pronounced.
-
Program the notes around the kick, keep the release under control and use subtle sidechain compression or volume shaping. Listen to the kick and bass together when adjusting the low-frequency EQ rather than judging the bass in isolation.
-
Yes, particularly after adding saturation and low-frequency EQ. However, whether it needs a separate sub depends on the notes being played, the kick and the overall arrangement. For a cleaner low end, you can reduce the bass frequencies in the pluck and layer a simple mono sub underneath it.